Pre-form your rough before dopping. With the jamb peg you are cutting to make best use of your rough and not cutting to a diagram. The ratio used in the diagram may not suit your rough, just cut to a ratio that is pleasing to you.
There is no provision on these machines to individually preform a round girdle. the picture shows a home made preformer using 4 ball bearings. It works very well, fast and easy to use.
Any cut that has a straight girdle can be done on the machine as the offset rotating mast assembly can be positioned to do the girdles. Most available jamb peg machines will have a slotted base, so cutting flat girdles won't be a problem.
Set the height of the arm above the first lap you are going to use, a 9-12mm spacer will work fine. If you are cutting large stones you may need a larger spacer. Use the spacer for each lap you use, this will eliminate the need to find that first facet when you change laps. Avoid using the cheater adjustment on the first half of the stone and you will have excellent repeatability.
If you stick to the same spacer then numbers you use will stay consistent.
The upper part of the table attachment is permanently fixed to the machine. Once the table is cut it makes it a lot easier to judge the size of the main facets. Adjusting the table attachment will be trial and error at first.
The lower part of the attachment just clips on to the side arm. Remember to set the cheater to the correct position before starting a stone. If the cheater is off then the table will be off.
The table is always cut with the lap running in reverse- anticlockwise
The lap direction must be switched back to the normal cutting direction- clockwise when tables are finished, a lot of damage can occur to the lap, machine and yourself if the dopstick happens to dig into the lap at high speed.
If I'm trying a new cut and not sure of the indexing, I can use this conversion chart to convert the indexing from a faceting diagram to get the indexing I need for the Jamb Peg. In the chart the octagonal outline represent the 8 mains, the circular section shows a standard 64 index gear, the outer numbers are the jamb peg indexes.
On a SRB eight mains are cut using the 8 flats on the dopstick. then 8 stars at number 4, then 8 break facets at -2 and then 8 break facets at number +2. (-2 equates to 62 on a standard index gear and +2 equates to 2 on a standard index gear).Any diagram can easily be converted to the jamb peg method of indexing, if the ratio is close between your stone and the diagram, then it should work, you may need to change indexes because of the ratio difference between your stone and the cutting diagram.
You may encounter the odd design where the mains are not conventionally placed.
A similar chart can be drawn up for the 96 index gear.
Jamb peg machines are not all the same, so they don't all function the same, and this would make it difficult to come up with a complete diagram for the jamb peg. I think only the indexing would be of help, angles etc. are taken care of when cutting.
It's easy to convert a published design to one for the jamb peg. There may be a differences in the indexing due to the ratio of the pre-form, simple trial and error will sort this out. There will be some designs where you may need to take notes to keep track of what you are doing, but the time will come when notes will be seldom needed.
A jamb peg diagram, if used, would be numbered as follows - 0 for main facets, 4 is used for star facets and break facets 2- for left side and 2+ for right side. On a SRB only 4 index changes are used to cut the stone.
The conversion chart for the 64 index should allow you to convert any faceting diagram for the 64 index, for example, index number 18 would be +2, index 54 would be -2, index 25 would be 1 and so on. There are many 96 index designs which can be cut using the 64 index, if you run into problems then make a modification, I doubt anyone will notice.
This is not a protractor in the photo, just numbered holes on the jamb peg head to hold the point of the dopstick. There is no protractor or hard stop, you have to choose your own angles. I will check the pavilion main or culet angles with a digital inclinometer to make sure I'm cutting above the critical angle of the stone., You can check the crown angle with the gauge, around 35deg is average. Don't be tempted to use it on other facets, it's not worth the trouble.
The meter in the photo shows 37.70 deg, I would have no problem using this for sapphire, the rest of the stone would be cut by eye. Depending on the stone size you get to know the range of numbers on the head you can use, for example, 10.5 would be as low as I can go for zircon, 9.5 for sapphire and 8.5 for quartz. A larger stone may need to be checked with the digital inclinometer.
After the stone is preformed the table is cut as this will make it easier to cut the mains all the same size, this is the hardest part, if you achieve this then all the other facets should fit. After pre-polishing, the table may be a bit small, just go back and redo it.
Once the table and mains are done then I cut the stars then the break facets, it pays to under cut a bit as it's easy to go back and redo any facets that need a bit more work. Avoid using the cheater when doing the crown and you will have perfect repeatability, you can go back and redo any facet at any time.
At the factory where I first tried the Jamb Peg I started cutting as I would with a mast machine, I was told it doesn't work that way and to stop for a minute and listen to the music...which was the sound of the other cutters in the same room, More cutting and less looking. Some stones like zircons where you encounter hard and soft facets, will need more care, so more looking than with sapphire, quartz etc. Cut the complete row then have a look. Because of the feel and sound of the stone on the lap you can cut tiny facets easily and accurately.
You have a lot of freedom when using the jamb peg, no gadgets, never have to worry about a facet being a 1/10 of a degree out of place, most of the time I don't know what the angle is anyway.
I make sure that the main or culet facets are cut above the critical angle of the stone being cut, use the digital inclinometer for this. I have cut several thousand stones over the past 25 years with the jamb peg, and I can honestly say I have never been disappointed.
Cut the table first then start the main facets, I start with number 10 on my machine, yours may be different, it will be obvious if it's too low or too high, so make the adjustment, keep the table about 50%.
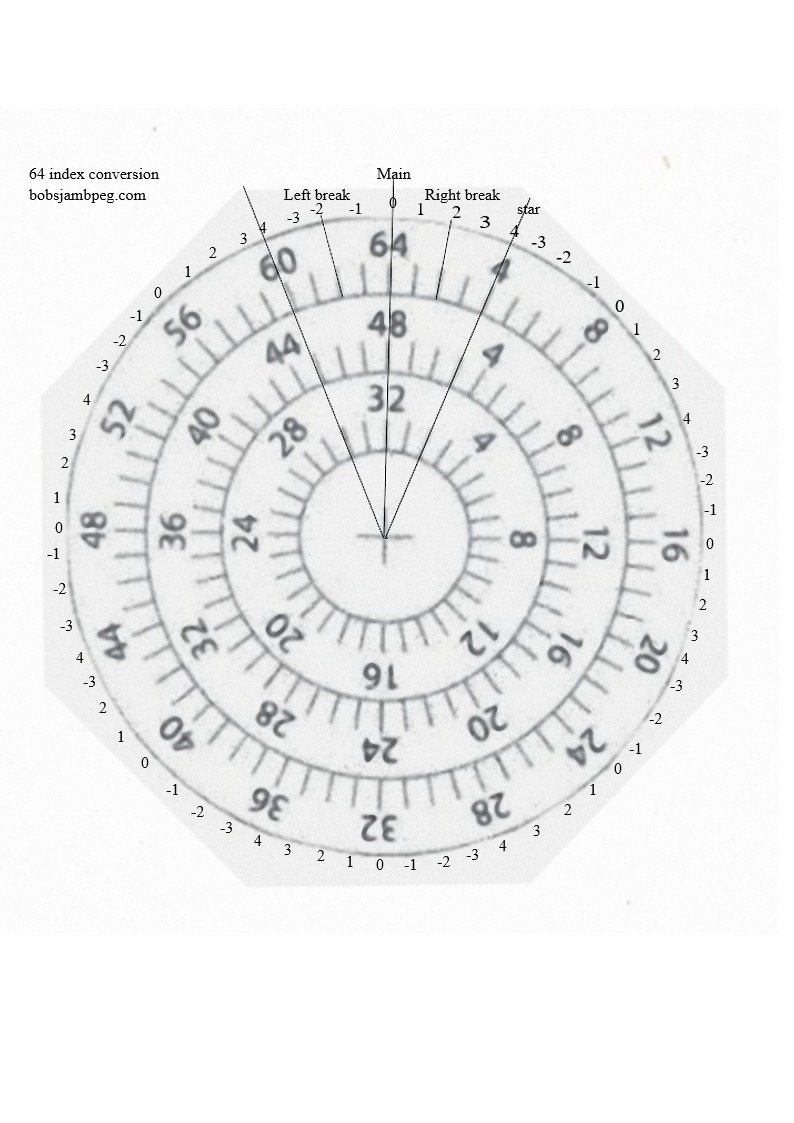
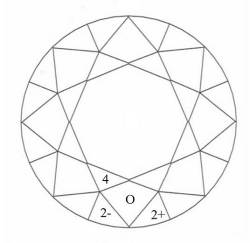
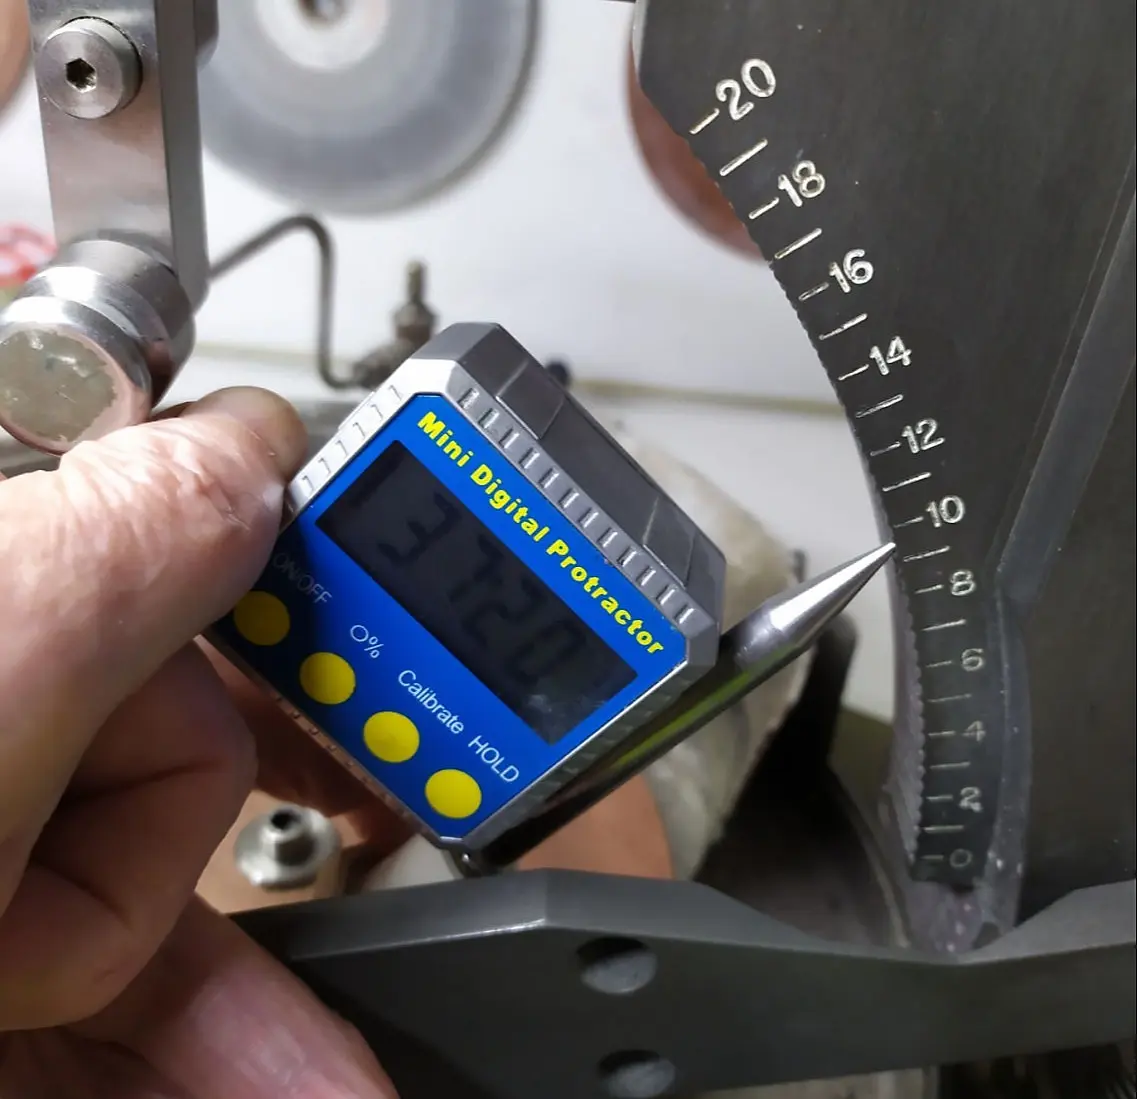
Now for the pre-polish lap. Pre-polish the table and mains, set the index to 4, star setting, just touch the lap on number 15 on the quadrant first and this will give you an indication whether the angle of the cut is too high or too low, may have to drop it to 14.5, you will see when it looks right, Now for the break facets, try number 8.5 on the head to start with, index set on minus 2 for left break facet, just touch the lap to get an idea of where the facet will be, you may have to move up to number 9 or down to number 8. When the facet looks right go ahead and cut the 8 left side facets, don't over cut. Now do the same for the 8 right side break facets with index set on plus 2. Avoid using the mast height adjustment, if you can't make perfect facet meets on the numbers you chose, fix theses meets at the polishing stage.
I polish table first, then stars, mains and break facets last. If you polish the mains first it is highly likely you will have to go back and touch up the mains because you have over cut a star or two.
You will make mistakes on the first few stones but it won't take long for it to all come together and then mistakes are rare.
To get a trouble free polish make sure you have a good pre-polish, no rough edges.
This stone was dopped by eye and after the girdle was done it was a offset, should of been centered. It was then transferred using a transfer block. The stone was able to be completed because it was level.
With practice transferring by eye gets easier, the difficult part is getting it level, being offset is not a real problem. So after transferring just cut the first row leaving as much girdle as possible. If the girdle is not level you can warm the stone and re-position the stone. Use wax.
The stone is most likely not 100% centred on the dopstick but a transfer block can still be used for small stones as it keeps the stone level, The stone may be offset after transferring but as long as stone is level it won't be a problem. Use wax for the first half and epoxy for the second half. If you have problems transferring by eye, then you can use this method on any stone which has been centered, as most rounds are.
Mobirise.com